SELLUP ROTO HOSE

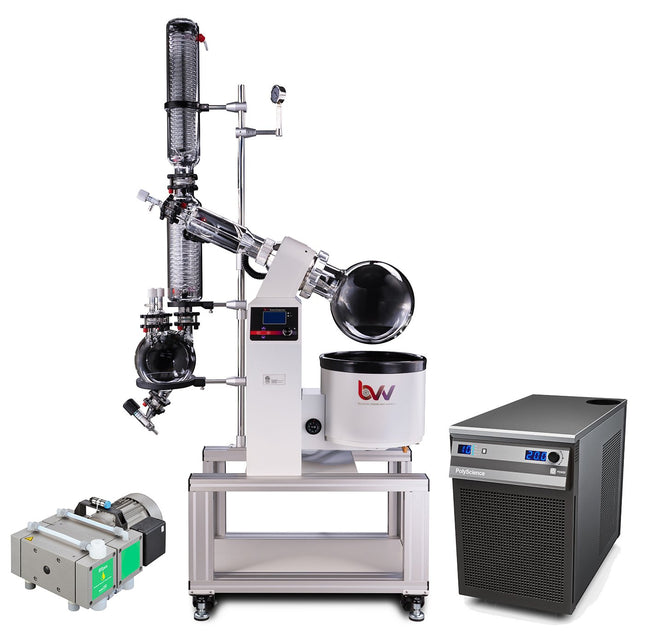
10L Neocision ETL Lab Certified Rotary Evaporator Turnkey System
10L NEO Rotary Evaporator Turnkey System 10L NEO Rotary Evaporator Turnkey System setup includes all the necessary components to successfully perform solvent recovery via rotary evaporation. A cold trap should always be used inline between your vacuum system and application to protect the pump from volatile vapors. To keep your bath heating properly, this unit should only be used with RO or DI water. 10-50L NEO and ECO Rotary Evaporator Diagram 10L NEO Rotary Evaporator Turnkey System setup includes: 10L Neocision ETL Lab Certified Rotary Evaporator Polyscience 6160T 1HP Chiller 3/8" Gum Rubber - 100ft 3/8" Silicone Tubing - 25ft Welch BTpro100 Diaphragm Pump Adjustable Stainless Steel Hose Clamps This guide gives basic quick start instructions for rotovaps. It is intended to provide a starting point for learning the process. Parameters should be adjusted to suit specific needs. Clean and assemble unit. Make sure all pieces are cleaned and sterilized using an alcohol solution. Connect chiller to condenser and set to 0C (32F). Always fill a rotovap condenser from the top down (chiller output to top of condenser, chiller input to bottom of condenser). Connect vacuum pump to cold trap and connect cold trap to vacuum port on rotovap. Turn on heat bath and set to 40C (113F). Once heat bath, chiller and cold trap have reached desired temperatures, turn on rotovap motor and set speed to approximately 100 RPM (does not have to be precise). Keep in mind, higher RPM’s will increase evaporation power but also increase heat load. Start vacuum pump and allow vacuum to pull down for a few minutes before injection. Once vacuum has been pulled to a sufficient level (does not have to be precise but should be below 100 Torr), using the injection valve, very slowly inject approximately 500 mL of solution into evaporating flask and then close the valve. Allow this small amount to begin evaporating. You may see the chiller begin to rise in temperature, this is called “priming” the rotovap. Once the temperature stops rising or all liquid is almost completely evaporated, open the injection valve again very slowly so that a small amount of liquid begins to enter the evaporating flask. Do not close injection valve this time but continue to allow solution to enter the evaporating flask. At this point you must try to match the input speed to the output speed. What this means is that you should be injecting the same amount of liquid into the rotovap that is equal to the amount of liquid dripping from the condenser into the receiving flask. You will know that the input speed and output speed are matched because the chiller will remain at a stable temperature. If the chiller begins to rise, then you are injecting too much liquid. Dial back the valve until the chiller stabilizes. Once everything is stabilized, you may walk away from the rotovap if necessary. Check every so often to make sure temperatures remain stable and evaporation continues efficiently. **Note: All units are inspected for broken glass or parts before unit is shipped. If unit arrives damaged or glass is broken (this does not include minor imperfections or scuffs in glassware), Customer MUST contact BVV™ within 3 days of delivery to file a claim and receive a replacement part. If customer DOES NOT contact BVV™ within 3 days of delivery responsibility for replacement parts falls on the customer and they must pay for replacement pieces.*** ***Note: This item will ship by freight only.*** ***Glassware Safety Disclaimer: BVV™ is not responsible for failure of glassware which must be inspected before and after every use because it may eventually develop imperfections or damage through normal usage, mishandling, and stress caused by temperature variations. If an imperfection or damage is noted while inspecting the glassware DO NOT use the glassware because it can fail causing bodily harm or damage to the surrounding area.***
$12,450.00 - $15,005.00
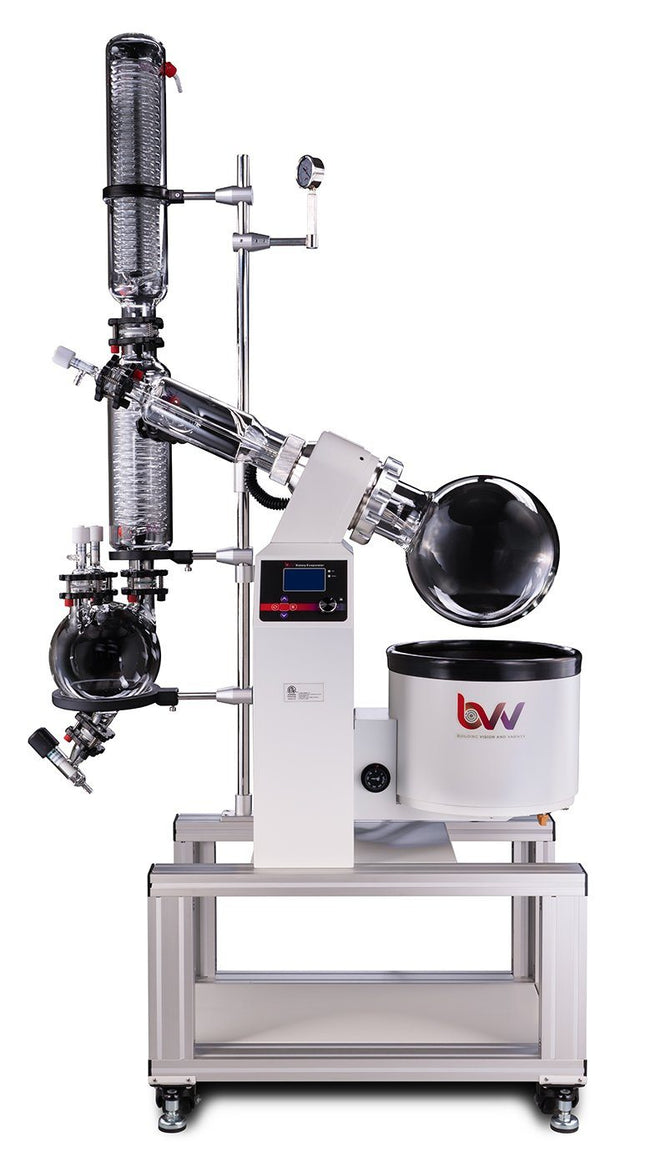
10L Neocision ETL Lab Certified Rotary Evaporator
10L Neocision ETL Lab Certified Rotary Evaporator The 10L Neocision ETL Lab Certified Rotary Evaporator is a full-scale system meant to fulfill the needs of large volume production and meet the requirements of a certified laboratory with its ETL certification standards. Featuring an electric lift bath and all PTFE valves for extreme chemical resistance, the 10L Neocision gives users the ability to recover large amounts of solvent in a smaller footprint with highly improved functionality. All Neocision rotovaps feature high-efficiency valves and drain ports making it easy to directly inject solution continuously without the need to stop the system or release vacuum to drain. The temperature and rotation speed are easily controlled from a single digital interface. Our rotovaps are a fraction of the price of more costly systems with the same functionality and evaporation efficiency. To keep your bath heating properly, this unit should only be used with RO or DI water. 10-50L NEO and ECO Rotary Evaporator Diagram Features: ETL Certified for Lab use. Digital temperature and speed control with simple user interface Electric Bath Lift Teflon Coated Bath for corrosion resistance High-efficiency drain port and injection valves Smaller footprint for improved workspace allocation Mobility with locking casters Shorter vapor path for faster evaporation and condensation Direct injection capability for continuous feeding of solution Continuous draining capability without the need to release vacuum or stop the system 1-year warranty on all mechanical parts. Does not include glassware. Specifications: Model 10L Solvent Pro Series Rotary Evaporator Optimum Ambient Temperature 5~25C / 41~105.8F Glass Material GG-17 High Borosilicate Power (V/Hz) 220-240V 60Hz Single Phase Speed Regulation Digital Step-less Regulation Rotation Speed 20-130 RPM Set Temperature RT+5-99C Temperature Control Digital Temperature Control Maximum Vacuum Pressure -29.8 inHg Evaporating Flask Capacity 10L (10000ml) Receiving Flask Capacity 10L (10000ml) Condenser Style Main + Auxiliary Vertical Double Helix Heater Max Current Draw (Amps) 25 Water Bath Material 304 Stainless Steel Water Bath Size 17.7 x 9.8 in. Lifting Function Electric Lifting Stroke 190mm / 7.5 in. Total Power Consumption (kW) 3300w Dimensions 81 x 44 x 20 in. Weight 155 lbs Vacuum Connection 14mm / .55 in. Barb Condenser Connection 18mm / .70 in. Barb Warranty 90 days excluding glass parts Certifications ETL Rotovap Quick Start Guide This guide gives basic quick start instructions for rotovaps. It is intended to provide a starting point for learning the process. Parameters should be adjusted to suit specific needs. Clean and assemble unit. Make sure all pieces are cleaned and sterilized using an alcohol solution. Connect chiller to condenser and set to 0C (32F). Always fill a rotovap condenser from the top down (chiller output to top of condenser, chiller input to bottom of condenser). Connect vacuum pump to cold trap and connect cold trap to vacuum port on rotovap. Turn on heat bath and set to 40C (113F). Once heat bath, chiller and cold trap have reached desired temperatures, turn on rotovap motor and set speed to approximately 100 RPM (does not have to be precise). Keep in mind, higher RPM’s will increase evaporation power but also increase heat load. Start vacuum pump and allow vacuum to pull down for a few minutes before injection. Once vacuum has been pulled to a sufficient level (does not have to be precise but should be below 100 Torr), using the injection valve, very slowly inject approximately 500 mL of solution into evaporating flask and then close the valve. Allow this small amount to begin evaporating. You may see the chiller begin to rise in temperature, this is called “priming” the rotovap. Once the temperature stops rising or all liquid is almost completely evaporated, open the injection valve again very slowly so that a small amount of liquid begins to enter the evaporating flask. Do not close injection valve this time but continue to allow solution to enter the evaporating flask. At this point you must try to match the input speed to the output speed. What this means is that you should be injecting the same amount of liquid into the rotovap that is equal to the amount of liquid dripping from the condenser into the receiving flask. You will know that the input speed and output speed are matched because the chiller will remain at a stable temperature. If the chiller begins to rise, then you are injecting too much liquid. Dial back the valve until the chiller stabilizes. Once everything is stabilized, you may walk away from the rotovap if necessary. Check every so often to make sure temperatures remain stable and evaporation continues efficiently. ***Note: All units are inspected for broken glass or parts before unit is shipped. If unit arrives damaged or glass is broken (this does not include minor imperfections or scuffs in glassware), Customer MUST contact BVV™ within 3 days of delivery to file a claim and receive a replacement part. If customer DOES NOT contact BVV™ within 3 days of delivery responsibility for replacement parts falls on the customer and they must pay for replacement pieces.*** ***Note: This item will ship by freight only.*** ***Glassware Safety Disclaimer: BVV™ is not responsible for failure of glassware which must be inspected before and after every use because it may eventually develop imperfections or damage through normal usage, mishandling, and stress caused by temperature variations. If an imperfection or damage is noted while inspecting the glassware DO NOT use the glassware because it can fail causing bodily harm or damage to the surrounding area.***
$4,600.00

