Meta ETOH
-


200 Proof Ethanol - USP Kosher - Excise Tax Included
Food Grade Alcohol - 200 Proof EXCISE TAX INCLUDED IN PRICING. HAZMAT ITEMS ARE NON-REFUNDABLE. ALL SALES ARE FINAL Food Grade Ethanol 200 Proof is USP-NF Certified & Kosher Certified. This product is the highest purity possible for extraction grade ethanol on the market, at 99.97% pure. Provides unmatched purity while performing extractions for crude oil or even cleaning equipment. 200 Proof Ethanol is a great choice when processing oil for short path distillation processes because it can be immediately winterized, filtered, and then rotary evaporated to recover the ethanol for later usage. United States Pharmacopeia (USP) and the National Formulary (NF) Certified. *Kosher Certified Product only comes in 270 gallon totes. Shop this product in sizes: 1 quart, one gallon, or 5 gallons. What Is Lab & Food Grade Ethanol? Pure Ethanol 200 Proof is also referred to as pure alcohol, absolute alcohol, grain alcohol, and pure grain alcohol. Due to its lack of additives, Food & Lab grade ethanol is considered a safe solvent, and is used in many processes: manufacturing processes, cosmetics processes, herbal tincture produce, food processing, and most commonly, botanical oils and extracts. Our product is safe for sanitizing, surface cleaning without streaking, sterilization, disinfecting, and antiseptic and tinctures. *Disclaimer(s): 1 Quart Bottles are exempt from additional Hazmat shipping charges and can ship immediately, Less paperwork for shipping is required for shipping only 1 single bottle per order. Spigots/Faucets are only compatible with 5 Gallon Plastic Jugs and must be purchased separately Shipments of this product require a 21+ signature at delivery Chemical Formula: C2H6O Molecular Weight: 46.069 CAS Registry Number: 64-17-5 Appearance Colorless Liquid Odor: wine-like, pungent Density 0.78945 g/cm3 @ 20 °C Boiling Point: 78.23C/172.81F Solubility in water: Miscible GHS Pictograms: GHS Signal Word: Danger GHS Hazard Statements: H225, H319, H360D GHS Precautionary Statements P210, P233, P240, P241, P242, P305+P351+P338 UN Identification Number: 1170 Proper Shipping Name: Ethyl Alcohol Transport Hazard Class: 3 Packing Group: II DOT Placard: Federal & State Law Requirements You must be the age of 21 or over to purchase this ethanol product. All Alcohol and Tobacco Tax Trade Bureau (TTB), federal, state and local laws must be complied with, and you may be required to provide BVV™ with your state or federal license. (Note: Container style and color may vary) 200 Proof Ethanol Safety Data Sheet (SDS) 200 Proof Ethanol Certificate of Analysis (COA)
$24.00 - $7,300.00
-


CDA-12A Denatured Ethanol n-Heptane
Ultra High Purity n-Heptane Denatured Ethanol - CDA 12A HAZMAT ITEMS ARE NON-REFUNDABLE. ALL SALES ARE FINAL (Note: Container style and color may vary) BVV's Ultra High Purity N-Heptane Denatured Ethanol (CDA 12A) is distinguished by its exceptional purity, Our CDA 12A formulation combines 95% Food Grade/USP/ACS 200 Proof Ethanol, derived from corn, with 5% high-purity N-Heptane. Adhering to stringent industry standards, ensuring it meets the precise requirements of our customers, our Ultra High Purity Heptane Denatured Ethanol excels across diverse applications widely adopted as an effective botanical extraction solvent and cleaning agent. Being that our Ultra High Purity Denatured Ethanol is made unfit for consumption when denatured with N-Heptane it is not subject to the Federal Excise Tax on alcohol saving you up to 72% without compromising on it suitability for top-tier extractions. Primarily utilized as pure ethanol in extraction processes, this solvent is favored for its cost-effectiveness and extraction efficiency. Reduce manufacturing costs and increase extraction efficiency with BVV's Ultra High Purity Heptane Denatured Ethanol. Key Features: Significantly Reduced Cost due to the absence of Federal Tax Produces Exceptional Quality Extractions Leaves No Residuals or Tastes Evaporates Completely in a Rotary Evaporator Chemical Formula: Ethanol C2H6ON-Heptane C7H16 Molecular Weight: 72.1057 CAS Registry Number: Ethanol 64-17-5N-Heptane142-82-5 Appearance Colorless Liquid Odor: Mint or acetone-like Density 0.7905g/cm³ Boiling Point: 78.5c/173.3F Solubility in water: Miscible GHS Pictograms: GHS Signal Word: Danger GHS Hazard Statements: H225, H319 GHS Precautionary Statements P210, P233, P240, P241, P242, P243, P261, P264, P271, P280, P303+P361+P353, P304+P340, P305+P351+P338, P312, P337+P313, P370+P378, P403+P233, P403+P235, P405, P501 UN Identification Number: 1987 Proper Shipping Name: Alcohols, N.O.S Transport Hazard Class: 3 Packing Group: I DOT Placard: What is Denatured Ethanol? Denatured ethanol, also known as denatured alcohol, is ethanol (ethyl alcohol) that has been rendered unfit for human consumption by the addition of denaturants. Denaturants are typically chemicals that make the ethanol taste bad or have toxic effects, and they are added to discourage people from drinking the substance. The denaturation process is done to avoid the high taxes and regulations associated with beverage alcohol, as denatured ethanol is intended for industrial, pharmaceutical, or cosmetic uses rather than for consumption. Common denaturants include heptane, methanol, isopropyl alcohol, acetone, and other chemicals. Denatured ethanol is widely used in various industries, such as in the production of paints, solvents, cleaning products, and as a fuel for alcohol burners. Why is Ethanol Denatured? Ethanol is denatured, or rendered undrinkable, for several reasons: Tax Purposes: Denaturing ethanol allows for the imposition of lower taxes on industrial or non-beverage alcohol compared to potable alcohol. Governments often place higher excise taxes on alcohol intended for human consumption. Regulatory Compliance: Denaturing ethanol is a regulatory requirement to discourage the illegal diversion of tax-free industrial alcohol for beverage use. The addition of denaturants makes it unpalatable and unsafe for consumption. Public Safety: Making ethanol undrinkable helps prevent accidental or intentional ingestion of industrial alcohol, which can be toxic. Denaturing agents are chosen to deter people from attempting to use denatured alcohol as a substitute for beverage alcohol. Industrial Use: Denatured ethanol is widely used in various industries, including pharmaceuticals, cosmetics, and manufacturing. It serves as a solvent, fuel, or raw material in these applications. Common denaturants include substances like heptane, methanol, isopropanol, and various chemicals that make the alcohol unsuitable for human consumption while maintaining its usability in industrial processes. The specific denaturing formulations, such as CDA 12-A mentioned earlier, are defined by regulatory agencies to ensure compliance with safety and tax regulations. What is denatured ethanol used for? Denatured ethanol is used for various industrial and commercial purposes where the alcohol is needed for its properties but should not be consumed. Here are some common applications: Industrial Solvent: Denatured ethanol is widely used as a solvent in industries such as pharmaceuticals, cosmetics, and manufacturing. It is effective in dissolving a variety of substances. Cleaning Agent: Due to its solvent properties, denatured ethanol is used as a cleaning agent for surfaces, equipment, and machinery in industrial and commercial settings. Fuel Additive: Denatured ethanol is sometimes used as a fuel additive, especially in the blending of gasoline. It can improve combustion efficiency and reduce emissions. Paint and Coating Industry: It is used as a solvent in the formulation of paints, varnishes, and coatings. Pharmaceuticals: Denatured ethanol is used in the pharmaceutical industry for various purposes, including the extraction of medicinal compounds. Laboratory Use: In laboratories, denatured ethanol is often used for tasks like sterilization and as a solvent for experiments. Inks and Dyes: It is employed in the production of inks and dyes due to its ability to dissolve pigments. Adhesives and Sealants: Denatured ethanol is used in the formulation of adhesives and sealants. Window Cleaning: It is used in commercial window cleaning solutions. Automotive Industry: In the automotive industry, denatured ethanol is used for cleaning and degreasing. What can be used to denature ethanol? Here are examples of common Completely Denatured Alcohol (CDA) formulations used to denature ethanol: CDA 12-A To every 100 gallons of alcohol, add either: Five gallons of heptane or 5 gallons of toluene. CDA-19 To every 100 gallons of ethyl alcohol (not less than 160 proof), add: 4.0 gallons of either methyl isobutyl ketone, mixed isomers of nitro propane, or methyln-butyl ketone 1.0 gallon of either kerosene, deodorized kerosene, gasoline, unleaded gasoline, rubber hydrocarbon solvent, or heptane. CDA-20 To every 100 gallons of ethyl alcohol (not less than 195 proof), add a total of: 2.0 gallons of either unleaded gasoline, rubber hydrocarbon solvent, kerosene, or deodorized kerosene, or any combination of these. What does CDA mean? Completely Denatured Alcohol (CDA) is a type of denatured alcohol that has been rendered unfit for human consumption by the addition of denaturing agents. Denatured alcohol is ethanol (ethyl alcohol) that has been intentionally adulterated to make it toxic, foul-tasting, or otherwise undrinkable. This denaturing process is done to exempt the alcohol from excise duty and other taxes, as it's not intended for use in beverages. The denaturing agents used in CDA can vary, but they often include chemicals such as methanol, isopropanol, or other substances that make the alcohol unpalatable and potentially harmful if ingested. The specific formulation of denatured alcohol may be regulated by government authorities to ensure it meets safety standards and legal requirements. CDA is commonly used in industrial applications, as a solvent, fuel, or as a cleaning agent. It's important to note that due to the addition of denaturing agents, CDA should not be used for purposes that involve contact with the human body or ingestion. Safety precautions, including proper ventilation, should be followed when working with denatured alcohol. What is CDA 12A? CDA 12-A is a formulation specified by the Alcohol and Tobacco Tax and Trade Bureau (TTB) for Completely Denatured Alcohol (CDA). The formula is defined under §21.26 as Formula No. 12-A. The composition of CDA 12-A is as follows: For every 100 gallons of alcohol, add either: 5 gallons of n-heptane or 5 gallons of toluene. This denaturing process renders the ethanol unfit for consumption while meeting regulatory requirements for various industrial applications. CDA formulations, including CDA 12-A, are used to denature ethanol for purposes such as industrial solvents, cleaning agents, and manufacturing processes. Can you remove heptane from CDA 12A? When n-Heptane is added to ethanol it creates an azeotrope between the ethanol and n-heptane. An azeotrope is defined as a mixture of two liquids that have a constant boiling point and composition through distillation. This azeotrope results in the ethanol and n-heptane evaporating at the same temperature, making it extremely difficult to separate the two through distillation. While these azeotropic solvents are still easily recovered from a botanical extract at a relatively low boiling point around 78C/173F using a rotary evaporator or falling film evaporator, it is near impossible to separate the two via distillation. What is an Azeotrope? An azeotrope is a mixture characterized by having identical concentrations in both its vapor and liquid phases. This stands in contrast to ideal solutions, where one component is usually more volatile than the other, allowing for separation through distillation. When an azeotrope forms, the concentrations in both phases remain the same, hindering separation through traditional distillation methods. Azeotropes consist of a blend of at least two different liquids, and this mixture can exhibit either a higher or lower boiling point than either of its individual components. Azeotropes become relevant when certain liquid fractions resist alteration through distillation processes. In typical mixtures, components can be extracted using Fractional Distillation, a process involving repeated distillation stages. The more volatile component vaporizes and is collected separately, while the less volatile component remains in the distillation container, resulting in two distinct, pure solutions. BVV™ 710 Extraction Solvent Safety Data Sheet (SDS) Pure Ethyl Alcohol USP Product Data Sheet (PDS) CDA-12 with nHeptane Certificate of Analysis (COA)
$22.00 - $2,060.00
-
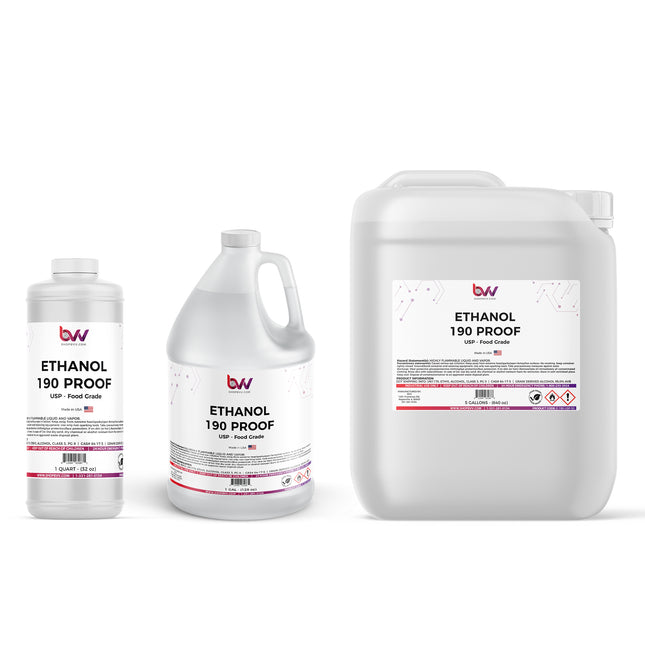

190 Proof Ethanol - USP Kosher - Excise Tax Included
Food Grade Alcohol - 190 Proof 95% AVB | Grain Derived Alcohol EXCISE TAX INCLUDED IN PRICING. HAZMAT ITEMS ARE NON-REFUNDABLE. ALL SALES ARE FINAL BVV™ Food / USP Ethanol 190 Proof, This product is the highest purity possible for extraction grade ethanol on the market, at 95% pure. Provides unmatched purity while performing extractions for crude oil or even cleaning equipment. 190 Proof Ethanol is a great choice when processing oil for short path distillation processes because it can be immediately winterized, filtered, and then rotary evaporated to recover the ethanol for later usage. A copy of your unexpired DRIVERS LICENSE, STATE ID CARD, or US PASSPORT and your completed and signed END-USER STATEMENT must be received before we ship out your order. End Users Agreement Chemical Formula: C2H6O Molecular Weight: 46.069 CAS Registry Number: 64-17-5 Appearance Colorless Liquid Odor: wine-like, pungent Density 0.78945 g/cm3 @ 20 °C Boiling Point: 78.23C/172.81F Solubility in water: Miscible GHS Pictograms: GHS Signal Word: Danger GHS Hazard Statements: H225, H319, H360D GHS Precautionary Statements P210, P233, P240, P241, P242, P305+P351+P338 UN Identification Number: 1170 Proper Shipping Name: Ethanol Solution Transport Hazard Class: 3 Packing Group: II DOT Placard: Federal & State Law Requirements You must be the age of 21 or over to purchase this ethanol product. All Alcohol and Tobacco Tax Trade Bureau (TTB), federal, state and local laws must be complied with, and you may be required to provide BVV™ with your state or federal license even when purchasing products that require a federal excise tax payment. (Note: Container style and color may vary) Ethanol 190 Proof USP/Food Grade Certificate of Analysis (COA) Ethanol 190 Proof USP/Food Grade Safety Data Sheet (SDS)
$32.00 - $6,500.00
-
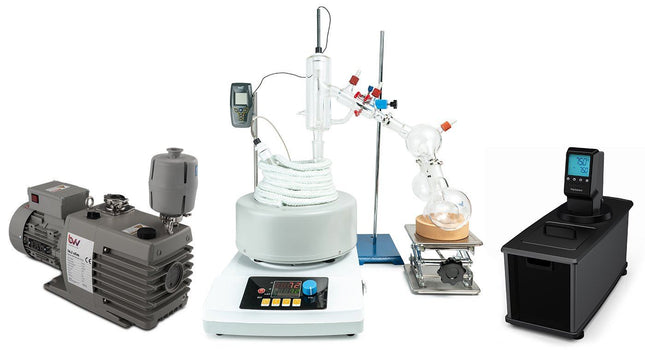

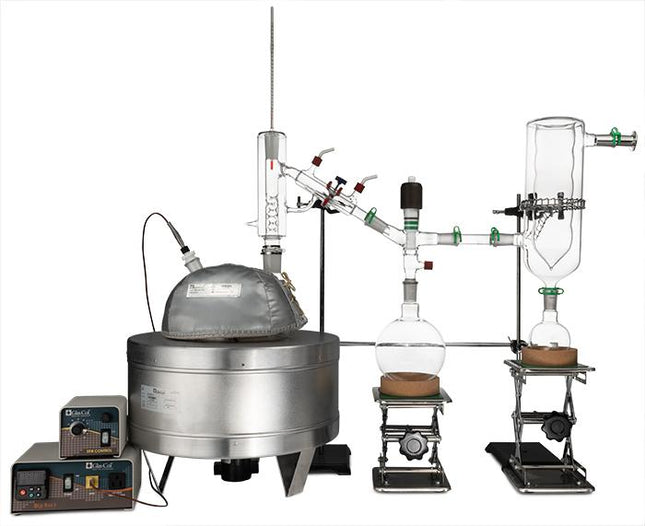
2L Premium Short Path Distillation Turnkey Setup with P2 Distillation Head
2L Premium Short Path Distillation Turnkey Setup with P2 Distillation Head The 2L Premium Distillation Turnkey Setup features our 2L Distillation Kit with P2 Distillation Head and USA made glass. Every component in this turnkey is made for precision, throughput, and repeatable results. Also included is our Pro Series 11.3CFM Corrosion Resistant Two Stage Vacuum Pump giving you extreme power and depth with long lifespan, the Bullseye Precision Vacuum Gauge from Digivac which is the most rugged and dependable vacuum gauge on the market, and a Polyscience 7L MX Heated Circulator for maximum condensation of vapors. You will also receive a Dewar Style Glass Cold Trap to keep all volatiles and solvents out of your vacuum system. This Turnkey Setup gives you everything needed to perform distillation at the highest level. The Premium Turnkey Kit Includes: 2L Distillation Kit w/ P2 Distillation Head KF-25 x 1/4" Barb Adapter Dewar Style Glass Cold Trap Bullseye precision Vacuum Gauge Polyscience 7L MX Heated Circulator Pro Series 14.1CFM Corrosion Resistant Two Stage Vacuum Pump Distillation Quick Start Guide This guide gives basic quick start instructions for distillation systems. It is intended to provide a starting point for learning the process. Parameters should be adjusted to suit specific needs, Before beginning distillation, ensure the following steps have been taken: Vacuum Pump is in good working order. Pump should be run against dry load to allow internals to warm up. Oil should be clear. Cloudy or dark oil should be changed. All glass components are in good working order and ready to be assembled A winterization and degassing procedure has been done to prepare oil for distillation Once all three of these steps have been completed, you are ready to begin distilling. Begin by placing stir bar in boiling flask and then load your material. This should be done using a funnel. A small amount of alcohol in the oil will give it a thinner consistency making it easier to transfer. Assemble all glassware and ensure each joint is properly greased. Do not use too much, as the vacuum pressure might pull some grease into the system. To ensure a full seal, spread grease in a circular motion by rotating glassware Attach circulator to condenser and set temperature to 50C. Allow circulator to reach temperature before beginning distillation. Connect vacuum pump to manifold. The manifold will allow you to isolate each individual component as well as let atmosphere into and out of the system. Connect receiving cow to cold trap. Connect cold trap to manifold. Connect vacuum gauge to manifold. At this point, ensure all connections are correct. Also ensure receiving cow is positioned to collect the first fraction in the far-left receiving flask. Circulator should be at its set temperature. Turn on vacuum pump to begin process. Turn on heat and set to 60C. Vacuum pump will begin to pull down and temperature will begin to rise. Watch the gauge to monitor vacuum pressure and stability. Start stir slower and increase speed with temperature. Once you are close to 60C, increase the temperature 20 degrees. Continue to raise the heat incrementally in 20-degree steps, increasing the set temperature as you near your set point. Increase temperatures incrementally until you reach 220C. You will see your first fraction somewhere between 180C and 190C or slightly before. This is the “heads” fraction. You will move to your second fraction when you see an increased reaction in the head, a slight color change toward golden, as well as a thickening of distillate. When this fraction hits, allow the distillate to “self-clean” the head for a minute or two then, rotate the cow to the middle receiving flask. Collect your “main body” fraction. You will see temps between 190-220C during this fraction. Continue to increase stirring speed as necessary. Reaction in the head may vary but it should never stop. As fluid level in the boiling flask decreases, increase stir speed. The final “tails” fraction is a mixture of the first and second fractions and should be saved for re-distillation later. Ideally, you want to turn the cow to the final flask before the tails fraction hits. The “tails” fraction has an obvious color change and will be darker than the “main body” fraction. You will see temps between 200-250C during this fraction. As fluid level in the boiling flask decreases even more, set stirring RPM higher (1000+ RPM). You may need to compensate with a bit more heat to finish of the final fraction as well. Once the process is complete, stop heat, stop stir, and stop vacuum. Let the atmosphere into the system. Be sure to properly store your distillate as exposure to air and light can cause oxidation. ***Note: This entire setup will ship via motor freight.*** ***Note: All units are inspected for broken glass or parts before unit is shipped. If unit arrives damaged or glass is broken (this does not include minor imperfections or scuffs in glassware), Customer MUST contact BVV™ within 3 days of delivery to file a claim and receive a replacement part. If customer DOES NOT contact BVV™ within 3 days of delivery responsibility for replacement parts falls on the customer and they must pay for replacement pieces.*** ***Glassware Safety Disclaimer: BVV™ is not responsible for failure of glassware which must be inspected before and after every use because it may eventually develop imperfections or damage through normal usage, mishandling, and stress caused by temperature variations. If an imperfection or damage is noted while inspecting the glassware DO NOT use the glassware because it can fail causing bodily harm or damage to the surrounding area.***
$6,000.00 - $7,650.00
-
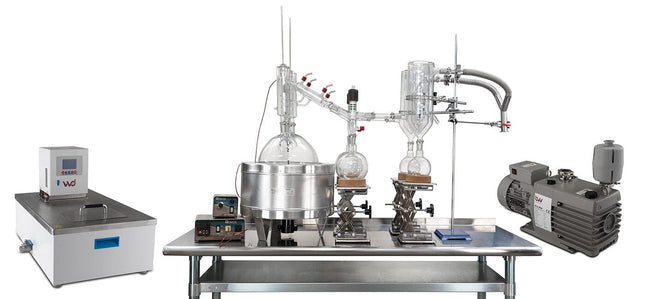

Neocision 10L Neocision Dual Head Short Path Distillation Turnkey System
10L Neocision Dual Head Short Path Distillation Turnkey System This unit carries a 2 day lead time. The 10L Neocision Distillation Turnkey Setup features our Dual 10L P5 Distillation Heads and USA made glass. Every component in this turnkey is made for precision, throughput, and repeatable results. Also included is a KF-25 Vacuum Pump giving you extreme power and depth with a long lifespan, the Bullseye Precision Vacuum Gauge from Digivac which is the most rugged and dependable vacuum gauge on the market, and a BVV 19L Heated Circulator for maximum condensation of vapors. You will also receive a Dual Dewar Style Glass Cold Trap to keep all volatiles and solvents out of your vacuum system. This Turnkey Setup gives you everything needed to perform distillation at the highest level. The Premium Turnkey Kit Includes: 10L Neocision Kit with Dual P5 Distillation Heads KF-25 2 Meter Bellows Dual Dewar Style Glass Cold Trap Bullseye Precision Vacuum Gauge BVV 19L Heated Circulator Your Choice Of KF-25 Vacuum Pump Distillation Quick Start Guide This guide gives basic quick start instructions for distillation systems. It is intended to provide a starting point for learning the process. Parameters should be adjusted to suit specific needs, Before beginning distillation, ensure the following steps have been taken: Vacuum Pump is in good working order. Pump should be run against dry load to allow internals to warm up. Oil should be clear. Cloudy or dark oil should be changed. All glass components are in good working order and ready to be assembled A winterization and degassing procedure has been done to prepare oil for distillation Once all three of these steps have been completed, you are ready to begin distilling. Begin by placing stir bar in boiling flask and then load your material. This should be done using a funnel. A small amount of alcohol in the oil will give it a thinner consistency making it easier to transfer. Assemble all glassware and ensure each joint is properly greased. Do not use too much, as the vacuum pressure might pull some grease into the system. To ensure a full seal, spread grease in a circular motion by rotating glassware Attach circulator to condenser and set temperature to 50C. Allow circulator to reach temperature before beginning distillation. Connect vacuum pump to manifold. The manifold will allow you to isolate each individual component as well as let atmosphere into and out of the system. Connect receiving cow to cold trap. Connect cold trap to manifold. Connect vacuum gauge to manifold. At this point, ensure all connections are correct. Also ensure receiving cow is positioned to collect the first fraction in the far-left receiving flask. Circulator should be at its set temperature. Turn on vacuum pump to begin process. Turn on heat and set to 60C. Vacuum pump will begin to pull down and temperature will begin to rise. Watch the gauge to monitor vacuum pressure and stability. Start stir slower and increase speed with temperature. Once you are close to 60C, increase the temperature 20 degrees. Continue to raise the heat incrementally in 20-degree steps, increasing the set temperature as you near your set point. Increase temperatures incrementally until you reach 220C. You will see your first fraction somewhere between 180C and 190C or slightly before. This is the “heads” fraction. You will move to your second fraction when you see an increased reaction in the head, a slight color change toward golden, as well as a thickening of distillate. When this fraction hits, allow the distillate to “self-clean” the head for a minute or two then, rotate the cow to the middle receiving flask. Collect your “main body” fraction. You will see temps between 190-220C during this fraction. Continue to increase stirring speed as necessary. Reaction in the head may vary but it should never stop. As fluid level in the boiling flask decreases, increase stir speed. The final “tails” fraction is a mixture of the first and second fractions and should be saved for re-distillation later. Ideally, you want to turn the cow to the final flask before the tails fraction hits. The “tails” fraction has an obvious color change and will be darker than the “main body” fraction. You will see temps between 200-250C during this fraction. As fluid level in the boiling flask decreases even more, set stirring RPM higher (1000+ RPM). You may need to compensate with a bit more heat to finish of the final fraction as well. Once process is complete, stop heat, stop stir, and stop vacuum. Let atmosphere into the system. Be sure to properly store your distillate as exposure to air and light can cause oxidation. ***Note: This entire setup will ship via motor freight.*** ***Note: All units are inspected for broken glass or parts before unit is shipped. If unit arrives damaged or glass is broken (this does not include minor imperfections or scuffs in glassware), Customer MUST contact BVV™ within 3 days of delivery to file a claim and receive a replacement part. If customer DOES NOT contact BVV™ within 3 days of delivery responsibility for replacement parts falls on the customer and they must pay for replacement pieces.*** ***Glassware Safety Disclaimer: BVV™ is not responsible for failure of glassware which must be inspected before and after every use because it may eventually develop imperfections or damage through normal usage, mishandling, and stress caused by temperature variations. If an imperfection or damage is noted while inspecting the glassware DO NOT use the glassware because it can fail causing bodily harm or damage to the surrounding area.***
$13,250.00 - $17,750.00
-
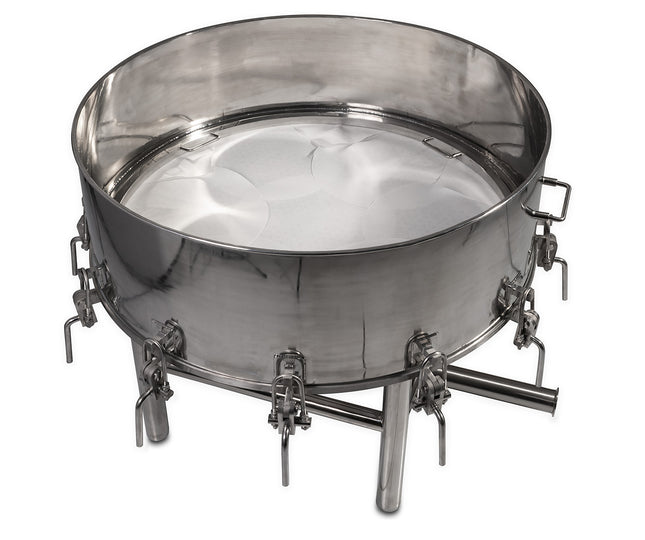

36 inch Filtration Funnel V2
Buchner Filtration Kit This filtration kit is operated by using a vacuum pump to pull the solution through the filter paper to remove particulate. The funnel has a 36" perforated plate to support the filter paper.
$7,600.00 - $8,180.00
-
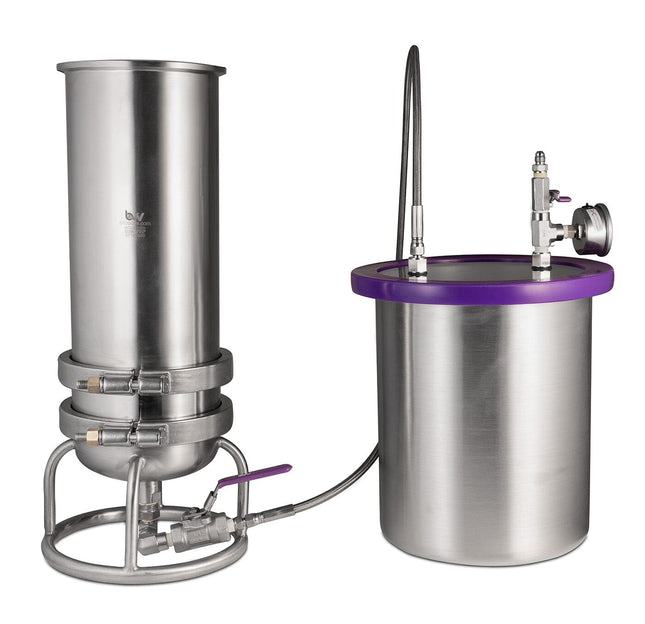
Benchtop 1 Micron Refinement Filter
Benchtop 1 Micron Refinement Filter Eliminate suspended particles with ease with our 1-micron Refinement filters. Complete with our 1-micron Dutch Weave sintered disk filter plate, these refinement filters provide complete retention of the filter paper,making it impossible for particulate to bypass the paper. Made from the highest-quality 304 stainless steel parts, these benchtop refinement filters are infinitely more robust than your typical porcelain Buchner funnels. They pair nicely with diaphragm vacuum pumps or our spark-free vacuum pumps paired with a cold trap. Processing Power Funnel Capacity: 5.5 Liters/1.45 Gallons Collection Capacity: 11.35 Liters/3 Gallons Specifications 6"x12" Funnel Body 6" 1um Dutch Weave Sintered Disk 6" Hemispherical Ring stand 1/4" Full Bore Ball valve with 1/4" JIC Drain port 3 Gallon Stainless Steel Collection Base with Glass Lid Back Mount Vacuum Gauge 1/4" JIC Butterfly Vacuum Valve 2.5UM 180MM Ashless Filter Paper Nitrile BUNA-N gaskets
$1,274.00
-
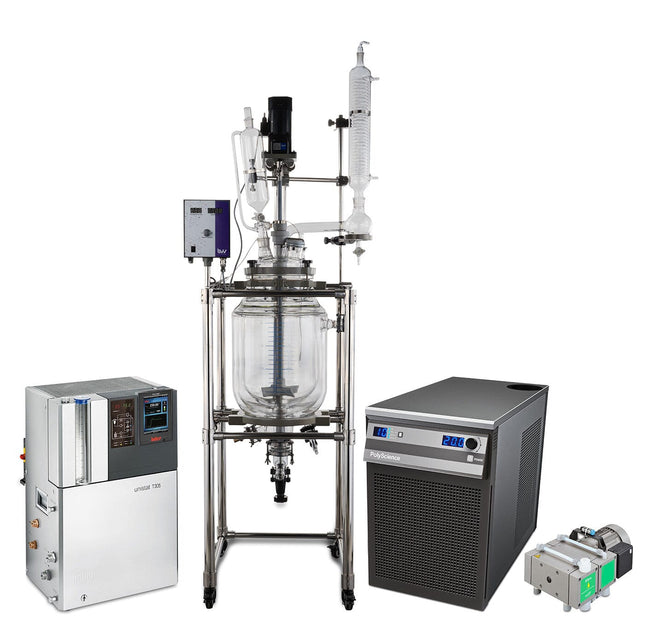
50L Turnkey Reactor Kit
50L Turnkey Reactor Kit The BVV 50L Double Jacketed Glass Reactor Kit is the ideal solution for small to medium-sized solvent recovery and decarboxylation applications. This kit includes everything to get you up and running including a Single 50L triple-layer Glass Reactor with Condenser, either a BVV 19L Heated circulator capable of heating to 220C or a UL-listed Huber T305 Capable of heating up to 300C, a 1HP Polyscience 6160T for chilling the condenser, a Welch BTpro100 for vacuum, 25ft of 3/8" Gum rubber tubing for vacuum connections, 20ft of reinforced PVC hose for the chiller, 1/2" Stainless Steel JIC Hoses for the heater, 5 Gallons of Therminol Heat transfer fluid and 5 Gallons of Propylene glycol. 50L Double Jacketed Glass Reactor Specifications Glass Material: GG-17 High Borosilicate Glass Internal Volume: 50L 10.5L Jacket Capacity Shelf Material: Aluminum Alloy Homogenizer Power: 110V/60Hz Homogenizer Speed: 0-400 RPM Digital Homogenizer Control Digital temperature probe readout included Double Jacket 3/4" Jacket Connections 1/4" and 3/8" Vacuum Connections Length: 24 in. Width: 30 in. Height: 90 in. Polyscience 6100 1 HP Chiller Specifications 6100 Series 1 HP Chiller with Turbine Pump, 100psi; 13.2l/min Display: LED Working Temperature Range C: -10 to 40 Temperature Stability: +/-0.1 Temperature Calibration Capability: 1-point Pump Type: Turbine Working Temperature Range F: 14 to 104 Working Temperature Range C: -10 to 40 Reservoir Capacity (gallons): 1.11 Reservoir Capacity (liters): 4.2 Reservoir Cover: Screw-on cap Cleanable Air Filter: Yes Cleanable Fluid Filter: Yes Temperature Stability F: +/-0.2 Temperature Stability C: +/-0.1 Display: LED Display Resolution (Read): 0.1 Pump Type: Turbine Process Connections: 1/2" FNPT Over-Temperature Protection / Failsafe Heater Control: Yes Reservoir Liquid Level Indicator: Yes Reservoir Drain: Yes Cool Command Refrigeration Technology: Yes WhisperCool Environmental Control Technology: Yes Maximum Ambient Temperature F: 95 Maximum Ambient Temperature C: 35 Overall Dimensions (LxWxH inches): 27.6 x 14.5 x 22.6 Overall Dimensions (LxWxH cm): 70 x 36.8 x 57.5 Compressor Size (HP): 1 Refrigerant: R134a Shipping Weight (pounds): 199 Shipping Weight (kilograms): 90 Welch BTpro100 Specifications Model BTpro100 Free Air Displacement@60Hz,lpm(CFM) 100(3.5) Ultimate Vacuum Pressure, Torr 6 Maximum Vacuum, in. Hg 29.7 Horsepower, HP (watts) 0.5(390) Built-in adjustable vacuum - Gas Ballast Yes Head Material PTFE Diaphragm PTFE Inlet/outlet Connection NW16 flange1 Agency (National Recognized Lab) cUL Weight, lbs (kg) 40.3(18.3) Overall DimensionsLxWxH in.(cm) 9x15x7(23x38x18) Shipping Weight, lbs(kg) 48.5 (22) Shipping Carton DimensionsLxWxH in.(cm) 18.9x12.6x11.8(48x32x30) HUBER T305 Specifications General Information & Temperature Controller Temperature range 65...300 °C Temperature stability ±0,02 °C Temperature control TAC, self-optimizing (True Adaptive Control) Controller Pilot ONE (E-grade "Basic") Safety class III / FL Protection class IP20 Dimensions (W x D x H) 425 x 250 x 631 mm | 16.73 x 9.84 x 24.84 inches Weight 37 kg | 81.59 pounds Heating / Cooling Capacity Heating capacity 4,8 kW Circulation Pump Pressure pump max. 45 lpm ; 0.9 bar | 11.89 gpm ; 13.05 psi Pump connection M24x1,5 AG male Permissible viscosity 50 mm²/s Connections Pt100 connection Pt100 Analogue input via optional Com.G@te Analogue output via optional Com.G@te Digital interface RS232, Ethernet, USB Device, USB Host Operating Data Old sku 1003.0022.01 Permissible ambient temp. 5 to 40 °C Filling volume min. 1.45 Liters | 0.38 gal Volume of expansion 2.8 Liters | 0.74 gal Power supply 208V 3~ 60Hz Current max. 15 A Fusing 15,5 A
$24,250.00 - $45,000.00
-


Nanofiltration Skid 2540 Roto Killer (15-30 GPH)
2540 Nanofiltration Skid Note: This product carries 4 week lead time Perform organic solvent recovery or botanical extract purification with ease with our 2540 nanofiltration skid. Replace up to 7X 50L Rotary evaporators with a single Skid. BVV's 2540 Nanofiltration Skid is designed to meet Class 1 Division 1 standards. With the ability to recover 30 gallons of ethanol per hour without the application of heat, preserving target compounds and utilizing a fraction of the energy consumption of a traditional falling film qualifying our 2540 Nanofiltration Skid for energy saving rebates. Processing Power Capacity: 15 GPH or 30 GPH of solvent recovery. Solvents: Ethanol, Methanol Specifications 4X 2540 nanofiltration housings Stainless steel 6GPM pump with PTFE seals 7.5HP C1D1 1750 RPM Motor 7.5HP VFD 1/60/230 NEMA 4X enclosure (13A) Insulated 2"x18" Heat Exchanger Polyscience 1.5HP Chiller 230/60/1/23.1 700PSI Pressure Relief Valve C1D1 Flowmeter 2X 0-1000 PSI Pressure Gauges 1.5" Intake & Retentate Lines 1/2" Permeate & Pressure Relief Lines Footprint (DxWxH) 30"x39"x79" Weight: 400 lb Maximum Pressure Rating: 700PSI Performance Variable Frequency Drive-based flow control Complete pressure control with manual pressure controls Retentate cooling with inline Heat exchanger & chiller 700PSI pressure relief valve with diversion line *Components shown are subject to change**This unit is meant for bulk solvent recovery, 90% of the total volume of solvent an additional solvent recovery apparatus is recommended to evaporate to dryness*
$29,000.00 - $32,500.00
-
Neocision 5L Neocision Short Path Distillation Kit
5L Neocision Short Path Distillation Kit This unit carries a 2 day lead time. The 5L Neocision Short Path Distillation Kit features our 5L Distillation Kit with P5 Distillation Head and USA made glass. Every component in this turnkey is made for precision, throughput, and repeatable results. You will also receive a Dewar Style Glass Cold Trap to keep all volatiles and solvents out of your vacuum system. The Premium Turnkey Kit Includes: 5L Neocision Kit with P5 Distillation Head KF-25 x 1/4" Barb Adapter Dewar Style Glass Cold Trap Distillation Quick Start Guide This guide gives basic quick start instructions for distillation systems. It is intended to provide a starting point for learning the process. Parameters should be adjusted to suit specific needs, Before beginning distillation, ensure the following steps have been taken: Vacuum Pump is in good working order. Pump should be run against dry load to allow internals to warm up. Oil should be clear. Cloudy or dark oil should be changed. All glass components are in good working order and ready to be assembled A winterization and degassing procedure has been done to prepare oil for distillation Once all three of these steps have been completed, you are ready to begin distilling. Begin by placing stir bar in boiling flask and then load your material. This should be done using a funnel. A small amount of alcohol in the oil will give it a thinner consistency making it easier to transfer. Assemble all glassware and ensure each joint is properly greased. Do not use too much, as the vacuum pressure might pull some grease into the system. To ensure a full seal, spread grease in a circular motion by rotating glassware Attach circulator to condenser and set temperature to 50C. Allow circulator to reach temperature before beginning distillation. Connect vacuum pump to manifold. The manifold will allow you to isolate each individual component as well as let atmosphere into and out of the system. Connect receiving cow to cold trap. Connect cold trap to manifold. Connect vacuum gauge to manifold. At this point, ensure all connections are correct. Also ensure receiving cow is positioned to collect the first fraction in the far-left receiving flask. Circulator should be at its set temperature. Turn on vacuum pump to begin process. Turn on heat and set to 60C. Vacuum pump will begin to pull down and temperature will begin to rise. Watch the gauge to monitor vacuum pressure and stability. Start stir slower and increase speed with temperature. Once you are close to 60C, increase the temperature 20 degrees. Continue to raise the heat incrementally in 20-degree steps, increasing the set temperature as you near your set point. Increase temperatures incrementally until you reach 220C. You will see your first fraction somewhere between 180C and 190C or slightly before. This is the “heads” fraction. You will move to your second fraction when you see an increased reaction in the head, a slight color change toward golden, as well as a thickening of distillate. When this fraction hits, allow the distillate to “self-clean” the head for a minute or two then, rotate the cow to the middle receiving flask. Collect your “main body” fraction. You will see temps between 190-220C during this fraction. Continue to increase stirring speed as necessary. Reaction in the head may vary but it should never stop. As fluid level in the boiling flask decreases, increase stir speed. The final “tails” fraction is a mixture of the first and second fractions and should be saved for re-distillation later. Ideally, you want to turn the cow to the final flask before the tails fraction hits. The “tails” fraction has an obvious color change and will be darker than the “main body” fraction. You will see temps between 200-250C during this fraction. As fluid level in the boiling flask decreases even more, set stirring RPM higher (1000+ RPM). You may need to compensate with a bit more heat to finish of the final fraction as well. Once process is complete, stop heat, stop stir, and stop vacuum. Let atmosphere into the system. Be sure to properly store your distillate as exposure to air and light can cause oxidation. ***Note: This entire setup will ship via motor freight.*** *Notice to Customers: All units are inspected for broken glassware or parts before leaving BVV™. If the unit arrives damaged (this does not include minor imperfections or scuffs in glassware), the customer MUST contact BVV™ within 72 hours from carrier delivery to file a claim. If the customer DOES NOT contact BVV™ within 72 hours from carrier delivery, then BVV™ cannot issue any replacement(s) or compensation for the item; a new purchase will need to be made for a replacement. BVV™ is not responsible for the failure of glassware which must be inspected before and after every use because it may eventually develop imperfections or damage through normal usage, mishandling, and stress caused by temperature variations. If an imperfection or damage is noted while inspecting the glassware DO NOT use the glassware because it can fail, which can cause bodily harm or damage to the surrounding area.
$6,950.00
-
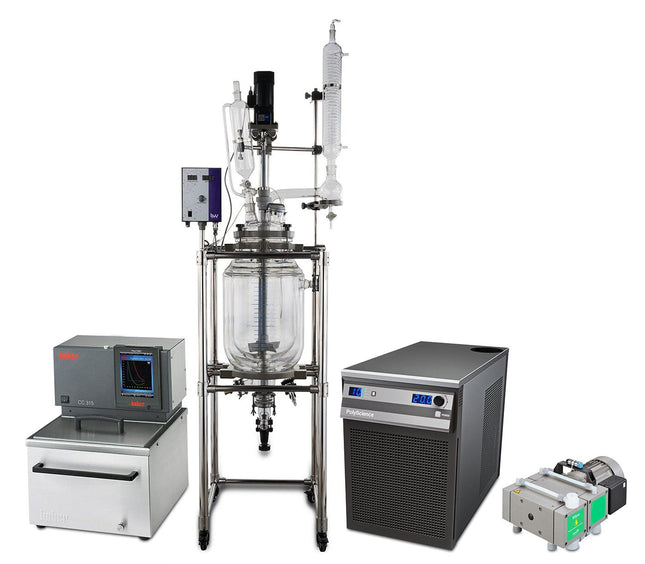
20L Turnkey Reactor Kit
20L Turnkey Reactor Kit The BVV 20L Double Jacketed Glass Reactor Kit is the ideal solution for small to medium-sized solvent recovery and decarboxylation applications. This kit includes everything to get you up and running including a Single 20L triple-layer Glass Reactor with Condenser, either a BVV 19L Heated circulator capable of heating to 220C or a UL-listed Huber CC-315B capable of heating up to 300C, a 1HP Polyscience 6160T for chilling the condenser, a Welch BTpro100 for vacuum, 25ft of 3/8" Gum rubber tubing for vacuum connections, 20ft of reinforced PVC hose for the chiller, 1/2" Stainless Steel JIC Hoses for the heater, 5 Gallons of Therminol Heat transfer fluid and 5 Gallons of Propylene glycol. 20L Double Jacketed Glass Reactor Specifications Glass Material: GG-17 High Borosilicate Glass Internal Volume: 20L 6.75L Jacket Capacity Shelf Material: Aluminum Alloy Homogenizer Power: 110V/60Hz Homogenizer Speed: 0-400 RPM Digital Homogenizer Control Digital temperature probe readout included Double Jacket 3/4" Jacket Connections 1/4" and 3/8" Vacuum Connections Length: 20 in. Width: 30 in. Height: 76 in. Polyscience 6100 1 HP Chiller Specifications 6100 Series 1 HP Chiller with Turbine Pump, 100psi; 13.2l/min Display: LED Working Temperature Range C: -10 to 40 Temperature Stability: +/-0.1 Temperature Calibration Capability: 1-point Pump Type: Turbine Working Temperature Range F: 14 to 104 Working Temperature Range C: -10 to 40 Reservoir Capacity (gallons): 1.11 Reservoir Capacity (liters): 4.2 Reservoir Cover: Screw-on cap Cleanable Air Filter: Yes Cleanable Fluid Filter: Yes Temperature Stability F: +/-0.2 Temperature Stability C: +/-0.1 Display: LED Display Resolution (Read): 0.1 Pump Type: Turbine Process Connections: 1/2" FNPT Over-Temperature Protection / Failsafe Heater Control: Yes Reservoir Liquid Level Indicator: Yes Reservoir Drain: Yes Cool Command Refrigeration Technology: Yes WhisperCool Environmental Control Technology: Yes Maximum Ambient Temperature F: 95 Maximum Ambient Temperature C: 35 Overall Dimensions (LxWxH inches): 27.6 x 14.5 x 22.6 Overall Dimensions (LxWxH cm): 70 x 36.8 x 57.5 Compressor Size (HP): 1 Refrigerant: R134a Shipping Weight (pounds): 199 Shipping Weight (kilograms): 90 Welch BTpro100 Specifications Model BTpro100 Free Air Displacement@60Hz,lpm(CFM) 100(3.5) Ultimate Vacuum Pressure, Torr 6 Maximum Vacuum, in. Hg 29.7 Horsepower, HP (watts) 0.5(390) Built-in adjustable vacuum - Gas Ballast Yes Head Material PTFE Diaphragm PTFE Inlet/outlet Connection NW16 flange1 Agency (National Recognized Lab) cUL Weight, lbs (kg) 40.3(18.3) Overall DimensionsLxWxH in.(cm) 9x15x7(23x38x18) Shipping Weight, lbs(kg) 48.5 (22) Shipping Carton DimensionsLxWxH in.(cm) 18.9x12.6x11.8(48x32x30) HUBER CC-315B Specifications Common Specifications Temperature range (-20) 28...300 °C Temperature stability ±0.02 °C Temperature control TAC, self-optimizing (True Adaptive Control) Controller Pilot ONE (E-grade "basic") Safety class III / FL Protection class IP20 Dimensions (W x D x H) 13.19 x 15.04 x 17.05 inches Weight 48.51 pounds Heating / cooling capacity Heating capacity 3 - 3,5 kW Circulation pump Pressure pump max. 25 lpm : 0,7 bar | 6.6 gpm ; 10.15 psi Suction pump max. 18.5 lpm : 0,4 bar | bar 4.89 gpm ; 5.8 psi Pump connection M16x1 AG male Permissible viscosity 50 mm²/s Connections Pt100 connection Pt100 Digital interface RS232, Ethernet, USB Device, USB Host Operating data Old sku 2007.0003.01 Permissible ambient temp. 5...40 °C Bath opening W x D / BD 10.63 x 5.71 / 7.87 inches Bath volume 15 Liters | 3.96 gal Filling volume min. 11.5 Liters | 3.04 gal Power supply 208V 2~ 60Hz Current max. 16 A Fusing 20 A
$23,500.00 - $31,500.00


